
DermEngine Integration for Genie
This page explains how to set-up the DermSync software to sync patient demography from the Genie software to DermEngine.
While using this software, patients opened on Genie will be transferred to the DermEngine platform. On DermEngine, images and lesions can be added to each patient.
Requirements:
- A Windows or Mac machine with Genie installed
- The user needs to have permission to install DermSync
Installation Steps:
- On the server* computer, download the integration software (DermSync)
| For Windows DermSync-setup-service.msi |
Learn about the differences by clicking here
- If you are using a Windows Machine, install DermSync on your machine (Default Folder: C:\Program Files (x86)\DermSync\).
Users need to have write permissions on this folder.
Note: We recommend installing DermSync for all users.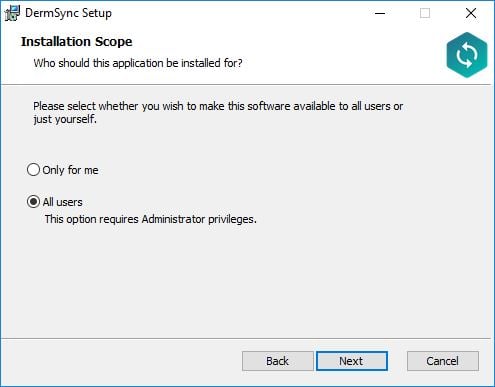
- Create a folder that will be used for patient transfer files, and allow write access for any accounts using Genie.

- In Genie, set up a connection to export patient data in HL7 format. From the menu bar at the top, select "File", then select "Connections".
Set Type to "File Transfer" and Format to "HL7".
Set Machine to the name of the client machine. For each client machine, a new connection needs to be set up.
The Export Directory will need to be entered into the DermSync application in a later step.
Please note that you can configure connections for multiple computers from a single computer and that the same Export Directory can be used for all connections. However, each computer must appear as a separate item in the list. When using multiple connections, it's also recommended to assign unique filenames instead of the default "Current_Patient.hl7". This helps avoid any issues with files being overwritten from the different connections.
If "Enable Export when clinical record opened" is selected, this file will be updated every time the patient's clinical record is opened.
If "Enable Export of New/Modified Patients" is selected, this file will be updated when the patient profile is updated.
- In Genie, open a patient's clinical record or edit the profile depending on the selection. Confirm that the Current_Patient.hl7 file is created in the specified folder.

- Double click to run the DermSync application or right click and select "Open".
- Enter your DermEngine credentials including your email and either your password or access key.
If you don't already have an account, visit https://app.dermengine.com/ or download the mobile app.
To learn how to create an account click here.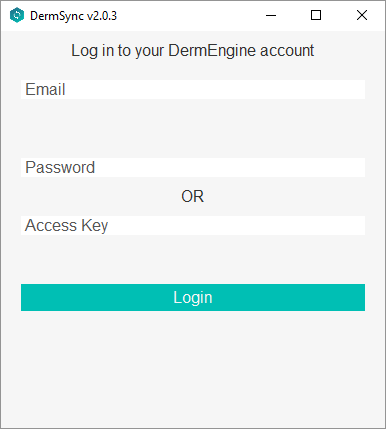
The access key can be retrieved on DermEngine under the Account menu - Select "Genie" from the drop down list
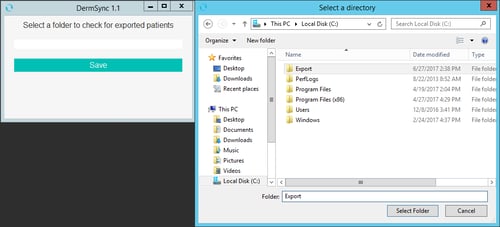
- In the DermSync application, open the folder you set up earlier. The Current_Patient.hl7 file is created when a patient is opened on Genie and deleted when the patient is closed. If there is no patient currently open, the name of the folder can still be entered.
- Once you have successfully logged in, any patients opened on Genie will be available within your Patient List on the DermEngine web platform and mobile app.
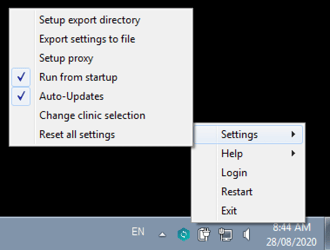
- To change the export location on DermSync at a later time, select the taskbar, select "Settings", then select "Setup export directory".
Transfer Patients:
If "Enable Export when clinical record opened" is selected, this file will be updated every time the patient's clinical record is opened.
If "Enable Export of New/Modified Patients" is selected, this file will be updated when the patient profile is updated.
To filter by appointment:
- Create a new Appointment Type, e.g. "DermEngine Export"
- Change the Connection to Export when appt type is “DermEngine Export”

- When you see the patient and want to create their file for export, highlight the appointment and select Type > “DermEngine Export”. The file will be created instantly and then you can change it back to the original appointment type.

- Please note that this does function slightly differently when creating the HL7 files in the folder. Rather than using the naming convention specified in the box next to enable export, e.g. Current_Patient.hl7, it uses the date the record was created and the patient ID, e.g. 20191010153833_180.hl7. This will meant that each record is created uniquely and the contents of that folder will not automatically be overwritten.
Import Timeline Reports
(Requires DermSync v2.20 or higher)
Setup
- On Genie, set up the path for Lab Results Download, for example: "C:\Genie\LabRslts"
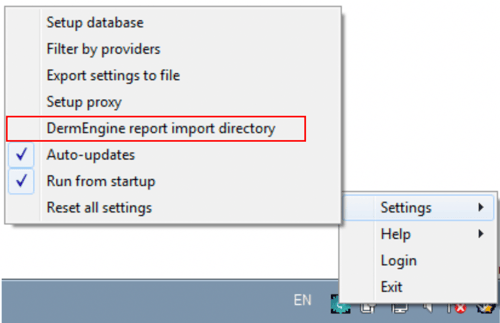
- On DermSync, click on the taskbar icon, then select "DermEngine report import directory". Select the same path in DermSync.
Export
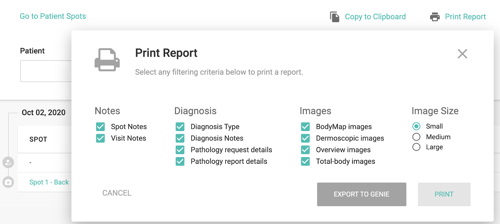
- On DermEngine web, create a Timeline Report. Press the button to Print Report and Export.
- DermSync will save the report to the selected folder.
- On Genie, the report will be available under Open - "Pathology and Radiology"
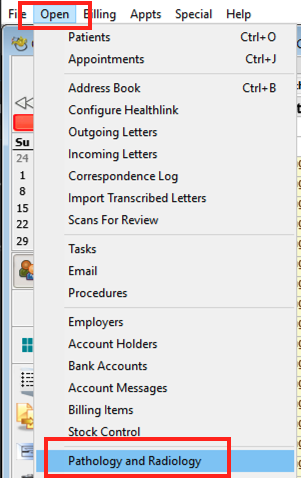
- Select the Import icon and Import button.
If the client computer is used, select the "Retrieve from server" button.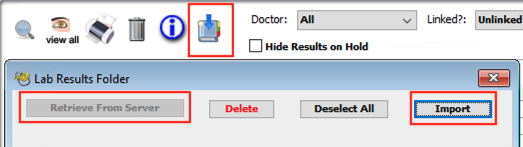
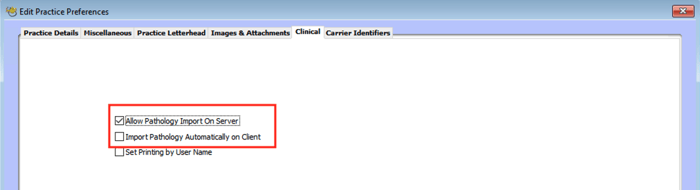
- Results can be set up to download automatically under Practice Preferences. Select either Server or Client depending on which machine DermSync was set up on.
Updating DermSync:
- When a new version of DermSync is available, the message below will pop up.
By simply clicking "Update", DermSync will download the most recent version and restart.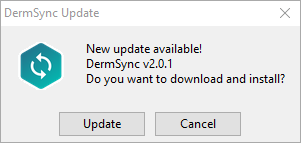
- If you are using DermSync v1.x, please make sure to first close the app by right clicking on the icon in the bottom right corner and selecting "Close".

