DermEngine Integration for Best Practice (Halo Connect)
Introduction:
This page explains how to sync patient demography from the Best Practice software to DermEngine.
While using this software, patients opened on Best Practice will be transferred to the DermEngine platform. On DermEngine, images and lesions can be added to each patient. After the visit is over, you can also export a PDF report from DermEngine to Best Practice.
If you are transitioning from the legacy SQL integration, a separate guide is available.
System requirements
Before this integration can be configured, each clinic must have a DermEngine account specific to that clinic, with at least one user assigned to it.
Halo Link is required for this integration and should be installed automatically when you apply a Bp Premier Data Update or Service Pack. You can find more information at: https://docs.stage.haloconnect.io/guides/practice-guide/
The system clocks on the database server and all workstations must be in sync within 60 seconds. If your system clocks are out of sync, open PowerShell with Admin Privilege and resync the clocks by running w32tm /resync.
Setup (Best Practice):
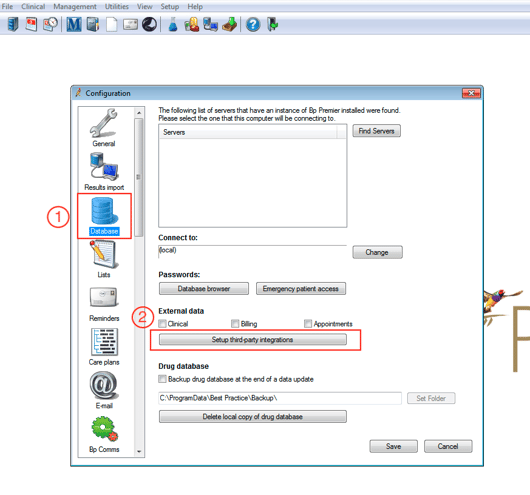
- From the menu bar at the top, select "Setup", then select "Configuration".

- From the left menu, select "Database," then click "Setup third-party integrations."
- Search for "MetaOptima (DermEngine) (via Halo Connect)" in the list, select it, and click “Generate Pairing Code.”

- Copy the values for Site ID and Pairing Code, which you will need for the next step.

Setup (DermEngine):
- To initiate the setup process, this must be done by the Enterprise Admin account. If you do not have access to this account, please reach out to your company's internal administration team, as MetaOptima is unable to grant access to this account directly. The Enterprise Admin has the option to either complete the setup using their account or to create additional administrative accounts, depending on your company's internal policies. For more information about administrative roles, visit: https://help.dermengine.com/what-types-of-administrative-based-roles-does-dermengine-support
Please be aware that you do not need a MetaOptima email address to log in. We recommend using an email address linked to your clinic, such as email@clinic.com, instead of email@metaoptima.com. - Click on your profile in the top right corner and select Manage Enterprise from the dropdown menu.
- In the left menu, scroll down to "Integrations" and select "Best Practice Halo." This page can be accessed by direct link from the Enterprise Admin account if the section is hidden: https://app.dermengine.com/v2/company/bp-halo
- Add a new integration by entering the Site ID and Pairing Code generated from Best Practice.

- Select which options should be enabled. The default setting, "Enable Integration" will sync patient data from Best Practice to DermEngine.

There are two optional features available that allow data to sync from DermEngine to Best Practice. Please review each section to understand which data will be synced and any potential limitations that may apply. - Sync Patients from Best Practice to DermEngine
This is the default setting to sync patient demographics from Best Practice to DermEngine. - Export Reports from DermEngine to Best Practice
This optional setting allows DermEngine to send PDF reports with images, back to Best Practice. - Sync Patients from DermEngine to Best Practice
This optional setting is intended for workflows where new patients are created in DermEngine rather than created in Best Practice. - Complete the Integration Settings by selecting which Providers, Appointment Types, and Locations you want to sync from Best Practice, then click on "Save".
There are 3 filters that can be set up. For example, if you apply filters for both providers and appointment types, then the patient will only sync if both conditions are met.- Filter by locations (clinics)
If your organization has only one location and one clinic, you can map them to each other. For larger organizations with multiple locations and clinics, you will need to map each location to the appropriate clinic(s) as needed. - Filter by providers
Some providers listed in Best Practice may not use DermEngine. From this list, you can select only the providers whose patients you want to sync to DermEngine. - Filter by appointment type
Some patients can visit the clinic for other reasons. From this list, you can select to filter only skin related cases or all types of appointments.
- Filter by locations (clinics)
- To sync all patients without applying any filters, simply select all options for Providers and Appointment Types. When a new provider or appointment type is added, make sure to include the new option in the selection.
- For each category, please make sure you have selected at least one option, then scroll down and click "Save" to apply your settings


Setup (if no DermEngine access)
The Settings page is available on the DermEngine website to the Enterprise Admin users. If if no DermEngine user can give access to the account, the following information can be provided to MetaOptima. The setup is unable to be completed without this information.
- Site ID
- Pairing Code
- The email address used to log into DermEngine
Additional information may be requested after pairing: - Whether to enable the option for: Export Reports from DermEngine to Best Practice.
- Whether to enable the option for: Sync Patients from DermEngine to Best Practice
- List of Best Practice Locations, with the matching DermEngine clinic for each location: Filter by locations (clinics)
- List of Best Practice Users to enable the integration for: Filter by providers
- List of Best Practice Appointment types to enable the integration for: Filter by appointment type
Transfer Patients
Patients will be sent to DermEngine when the clinical visit starts. The timer next to "Finalize visit" should start at 0m 0s. Please allow at least one minute after starting the visit for patients to sync. Once the patient has synced to the Patient List, you can find them by refreshing the page or searching for their name. If you are using the DermEngine mobile app, you can refresh the Patient List page by pulling down on the screen.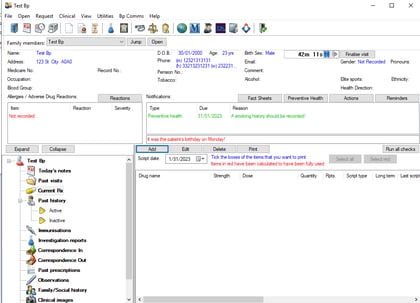
There are 3 filters that can be set up. For example, if you apply filters for both providers and appointment types, then the patient will only sync if both conditions are met.
Steps to transfer a patient:
- If using the appointment filter: In Best Practice, book the patient using an appointment type included in the filter.
- Log in to Best Practice as one of the providers selected in the provider filter.
- Open the Patient List in Best Practice, then open the patient record.
- Confirm the visit timer starts at 00:00.
- In DermEngine, refresh the Patient List.
- To reopen the Integration Settings page, log in to DermEngine as the Enterprise Admin, click on the profile icon (top right), select Manage Enterprise > Integrations > Best Practice Halo, then select an active site.
- For each Best Practice Location, select a clinic on DermEngine.
- At least one location must be selected in order to sync patients.
- Leave the selection empty for any clinics you do not wish to sync, or click X to remove a location from DermEngine.
- Only clinics within DermEngine that belong to the same enterprise and are managed by the logged in enterprise admin will appear in the selection list.
- Scroll down and click "Save" to confirm your selection.

- To reopen the Integration Settings page, log in to DermEngine as the Enterprise Admin, click on the profile icon (top right), select Manage Enterprise > Integrations > Best Practice Halo, then select an active site.
- Filtering the export based on the providers limits the patients sent to DermEngine.
- Select the providers whose patients you want to transfer to DermEngine from the list.
- When a new doctor is added to Best Practice, make sure to include the new doctor in this list.
- To quickly find a specific name, use your browser’s search function (usually CTRL + F).
- Scroll down and click "Save" to confirm your selection.

- To reopen the Integration Settings page, log in to DermEngine as the Enterprise Admin, click on the profile icon (top right), select Manage Enterprise > Integrations > Best Practice Halo, then select an active site.
- You can choose to send all appointment types, or to only send patients with specific appointment types.
- Patients who have had this appointment type at their most recent appointment will be synced when a new clinical visit starts. The timer will start at 0m 0s for a new visit.
- When a new appointment type is added to Best Practice, make sure to include it in this list.
- Select the providers whose appointment types you want to transfer to DermEngine from the list.
- To quickly find a specific type, use your browser’s search function (usually CTRL + F).
- Scroll down and click "Save" to confirm your selection.

- On Best Practice, when adding a new appointment, select “Appointment type” from the list.

Import Timeline Reports to Best Practice:
Setup
From the Integration Settings, enable the export of Timeline Reports to Best Practice. To reopen the Integration Settings page, log in to DermEngine as the Enterprise Admin, click on the profile icon (top right), select Manage Enterprise > Integrations > Best Practice Halo, then select an active site.

Export
- On DermEngine web, create a Timeline Report. Press the button to Print Report and export to Best Practice.

- On Best Practice, open the same patient.
- Select View, then select Refresh

- From the left menu, select "Clinical Images" to view the report

Import Patients to Best Practice
Best Practice can also be set up to transfer patient data from DermEngine to Best Practice.
Enable this feature only if you plan to create patients on DermEngine as part of your clinic’s standard workflow, such as when using DermEngine’s appointment booking system. If your regular workflow does not involve creating patients in DermEngine, we recommend keeping this feature disabled to avoid duplicate records in both systems.
- New patients created on DermEngine will be transferred.
- Patients with updated information from DermEngine will only be transferred until the patient is opened for clinical visit on Best Practice
- Once the patient has been opened on Best Practice, any further updates should be done on Best Practice and then synced back to DermEngine.
To set up the import, from the Integration Settings, enable the patient sync from DermEngine to Best Practice. To reopen the Integration Settings page, log in to DermEngine as the Enterprise Admin, click on the profile icon (top right), select Manage Enterprise > Integrations > Best Practice Halo, then select an active site.

The list of fields transferred is: First name, Last name, Date Of birth, Gender, Health number (Medicare), Address, City, Postal code, Phone number, Email
FAQ: