
DermEngine Integration for Best Practice
This guide is for the legacy SQL integration. Previously, DermEngine connected to the Best Practice SQL server through the DermSync application. This method is now replaced by Halo Connect:
Migration guide to transition from DermSync to Halo Connect
Halo Connect guide for new users
Introduction:
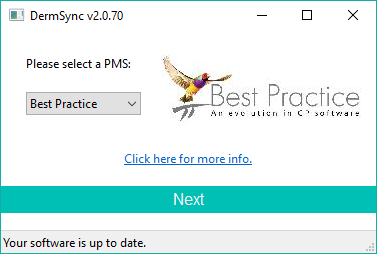
This page explains how to set-up the DermSync software to sync patient demography from the Best Practice software to DermEngine.
While using this software, patients opened on Best Practice will be transferred to the DermEngine platform. On DermEngine, images and lesions can be added to each patient. After the visit is over, you can also export a PDF report from DermEngine to Best Practice.
In order for DermSync to automatically receive updates and patches, Run from startup needs to be selected after the installation.
Requirements:
- A Windows machine with Best Practice Software installed
- The user needs to have permission to install DermSync
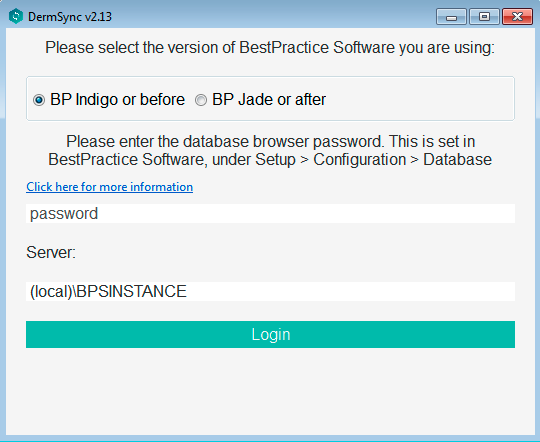
- The database browser password is required to read patient data from the Best Practice database. This password can be set for the first time in Best Practice. From the menu bar at the top, select "Setup", then select "Configuration".

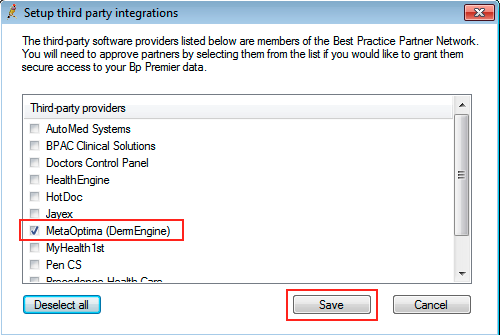
From the left side menu, select "Database". - If you are using BP Jade or a version of BP after Jade, you will need to click 'Setup third-party integrations' and then from the window that appears select 'MetaOptima (DermEngine)'
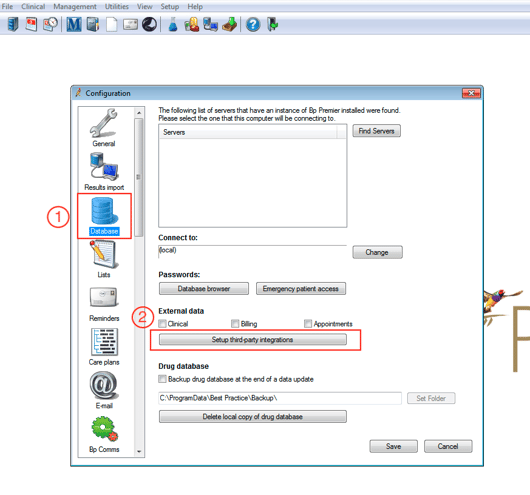
- Alternatively, if you are using BP Indigo or a previous version to BP Indigo, click on the button "Database browser" to set the password. You will enter this password into DermSync's database settings window.

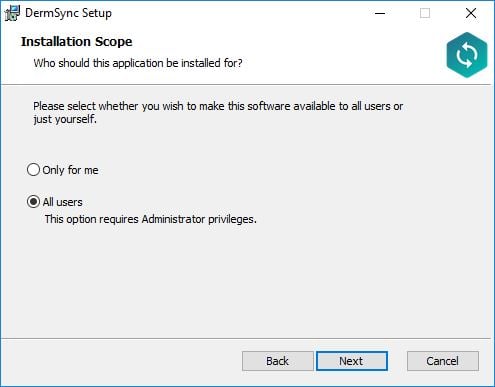
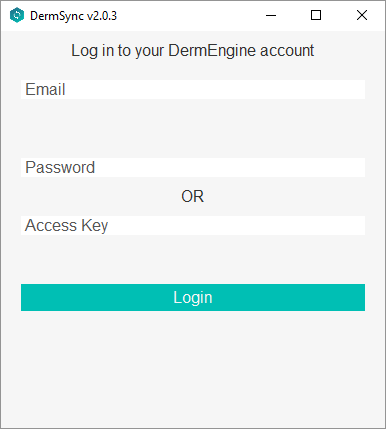
Installation Steps:
|

Transfer Patients
Patients will be sent to DermEngine when the clinical visit starts. The timer next to "Finalize visit" should start at 0m 0s. Patients will be available on your Patient List on DermEngine and the mobile apps.
There are 3 optional filters that can be set up. For example, if you apply filters for both providers and appointment types, then the patient will only sync if both conditions are met.
- Filtering the export based on the providers limits the patients sent to DermEngine.
- By default, if no selection is saved, patients from the current logged in doctor on the BP server will be transferred. Note: Usually the logged in user on the server is the IT support team, and not the doctor
- When a new doctor is added to BP, they need to be added to this list.
- Click the application icon in Taskbar (by default the bottom right of the screen)
Select settings and and then "Filter by providers"
- Select from the list, providers whose patients you would like to transfer to DermEngine:

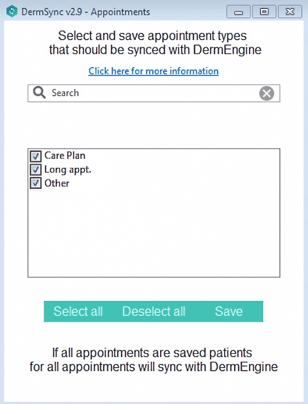
- By default, all appointment types are sent to DermEngine. However, you can choose to only send patients with specific appointment types. (requires DermSync v2.5 or higher).
- Patients who have had this appointment type at their most recent appointment will be synced when a new clinical visit starts. The timer will start at 0m 0s for a new visit.
- When you add a new appointment type to BP, make sure to include it in this list.
- On BP, add a new appointment. Select “Appointment type” from the list.
- On DermSync, click the application icon in Taskbar (by default at the bottom right of the screen).
Select Settings and then "Filter by appointment types"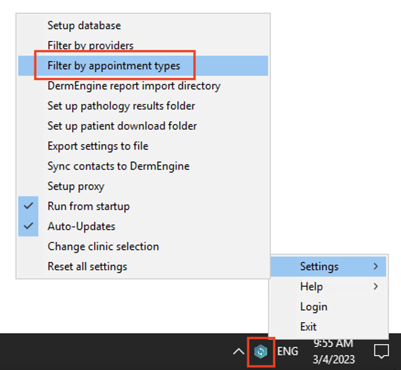
- Select from the list, appointment types whose patients you would like to transfer to DermEngine.
- By default all patients are synced to the same clinic, selected after the user logs in.
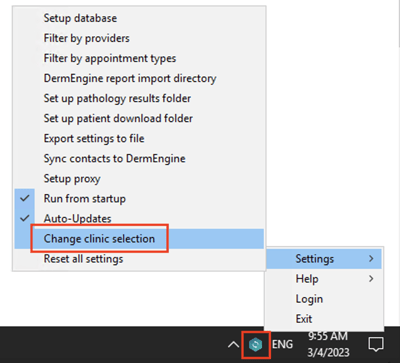
- DermSync can also be set up to sync patients from different Best Practice locations to different clinics (requires DermSync version 2.25 or later)
- Click on the taskbar icon, then select Settings -> Change clinic selection
- For each Best Practice Location, select a clinic on DermEngine.
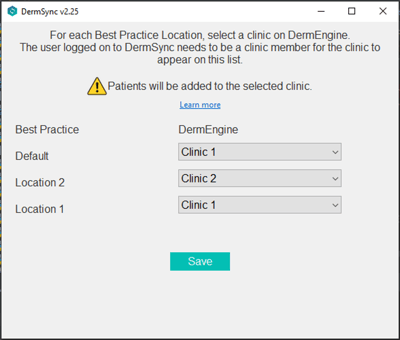
- The user logged on to DermSync needs to be a clinic member for the clinic to appear on this list.
- Click "Save" to save the selection.
Import Timeline Reports to Best Practice:
Setup
- Create a folder that will be used for patient transfer files, and allow write access for any accounts using Best Practice.
- On Best Practice, set up Results Import. From the menu bar at the top, select "Setup", then select "Configuration". From the left side menu, select "Results import".
Check the box for "Import investigation results on this computer" and add the folder to the "Report file search paths".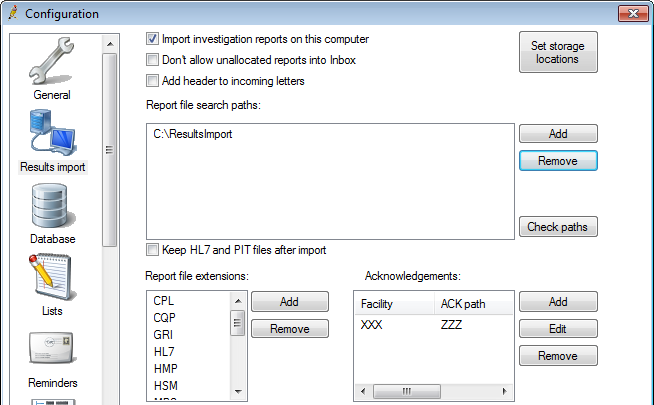
- On the Best Practice Server, run the BPLink utility to automatically check for results every 5 minutes.
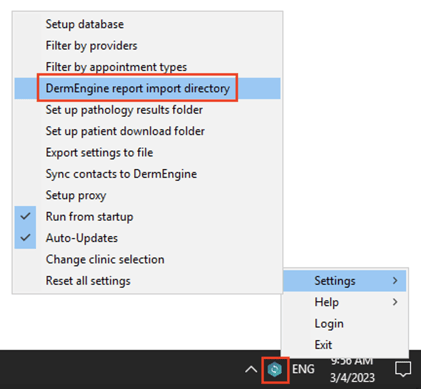
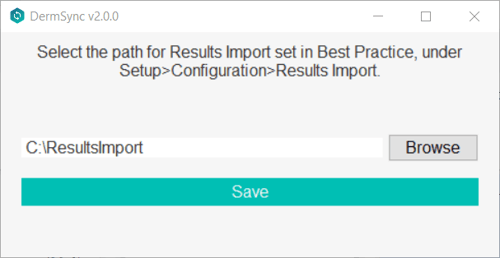
- Set up DermSync. Click on the taskbar icon, then select "DermEngine report import directory". Select the same path in DermSync.
Export
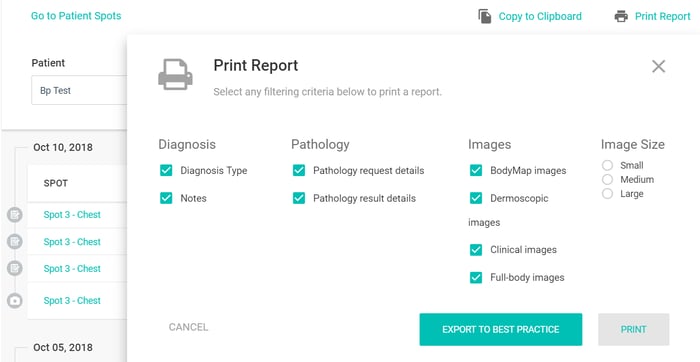
- On DermEngine web, create a Timeline Report. Press the button to Print Report and export to Best Practice.
DermSync will save the report to the selected folder. When Best Practice imports the report, the file will be deleted automatically. - After this, there are two different ways you can import reports exported from DermEngine to your selected folder.
- One way is to have 'BPLink' utility running. This utility will check every 5 minutes to see if there are any reports in the folder you set previously (under 'Report file search paths') and if found will import them into Best Practice and remove them from the folder.
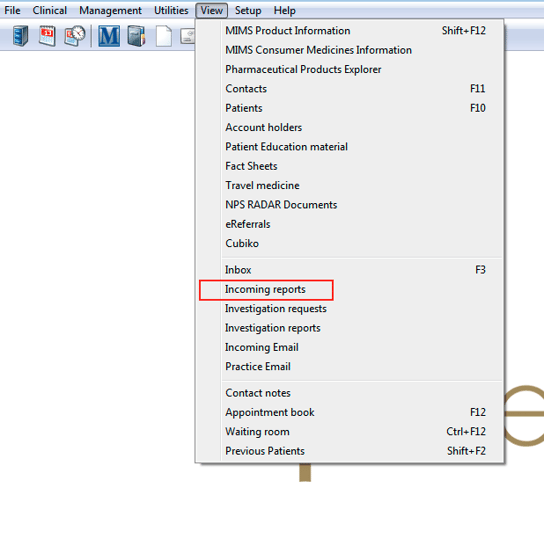
- Alternatively, to avoid waiting, you can manually import reports from your selected folder by selecting View > Incoming Reports from the main Best Practice screen. This will force an import of any reports found in the folder that you set.
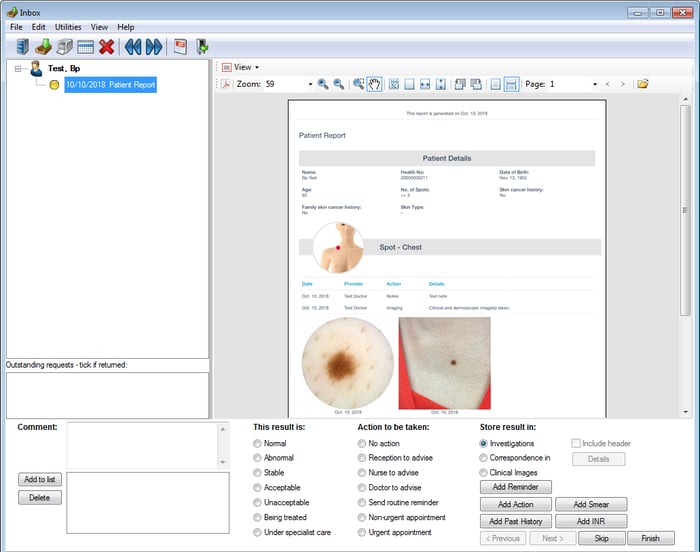
 Here you will find that the doctor under the 'Addressed To' column is the logged in doctor on DermEngine. The doctor under 'Allocated To' is set on BestPractice.
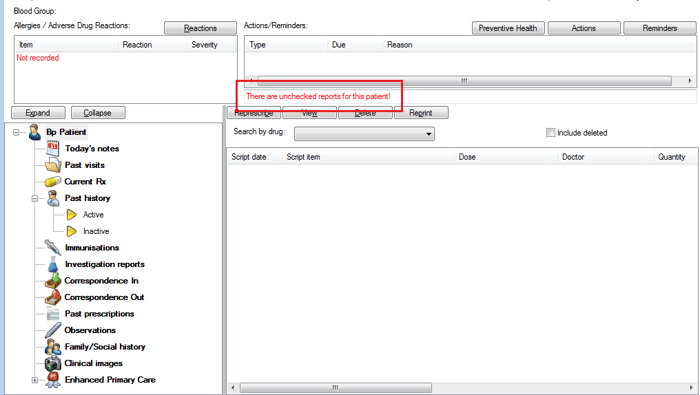
- Best Practice will notify that there are unchecked reports for the patients the next time the patient is open. When you open a patient and they have unchecked reports, you will see it indicated to you as below:
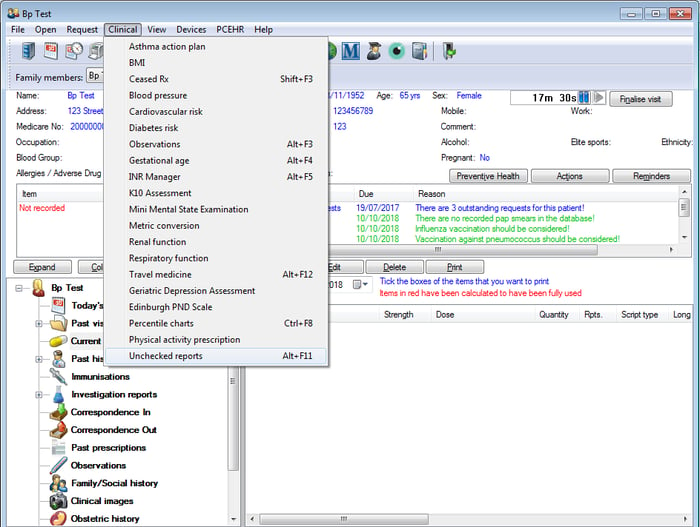
- Next, the report can be found in the patient's file, under Clinical > Unchecked reports.
Import Patients (BP Link):
Best Practice Linking can also be set up to transfer from DermEngine to Best Practice. This feature is available starting from DermSync v2.27
-
New patients created on DermEngine will be transferred.
-
Patients with updated information from DermEngine will only be transferred until the patient is opened for clinical visit on Best Practice. Once the patient has been opened on Best Practice, any further updates should be done on Best Practice and then synced back to DermEngine.
The list of fields transferred is: First name, Last name, Date Of birth, Gender, Health number (Medicare), Address, City, Postal code, Phone number, Email
Setup
-
Create a folder that will be used for patient transfer files, and allow write access for any accounts using Best Practice.
-
On Best Practice, set up Links. From the menu bar at the top, select "Setup", then select "Configuration". From the left side menu, select "Links".
Check the boxes for "Activate the link to another package" and "Run the data import process on this computer"
Set up the Patients.IN file, using the same folder created in step 1.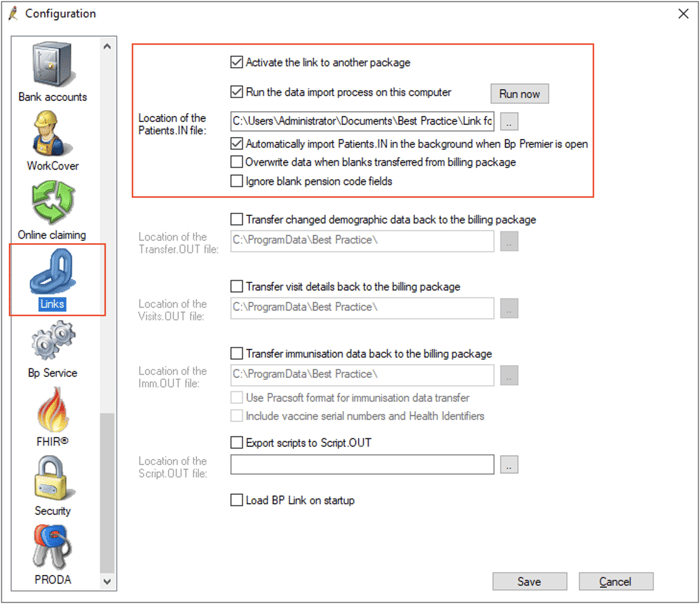
-
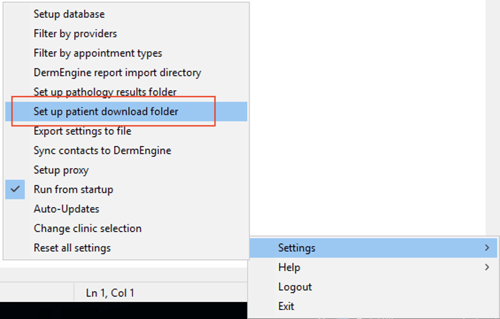
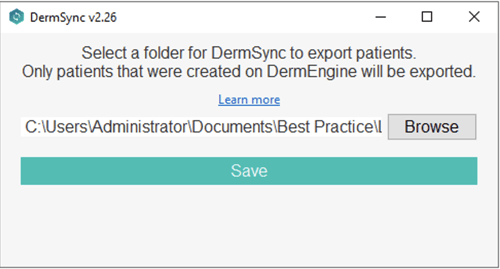
Set up DermSync. Click on the taskbar icon, then select "Set up patient download folder". Select the same path in DermSync.
-
When new patients are created on DermEngine, DermSync will save the patient to the Patients.IN file. When Best Practice imports the patient, the file will be cleared automatically.
Updating DermSync:
- When a new version of DermSync is available, the message below will pop up.
By simply clicking "Update", DermSync will download the most recent version and restart.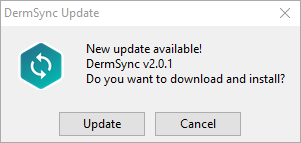
- If you are using DermSync v1.x, please make sure to first close the app by right clicking on the icon in the bottom right corner and selecting "Close".

FAQ:
- Open “ODBC Data Sources Administrator” - It should be installed on your machine by default.
- Add the database server using appropriate driver (SQL Server)
- Try testing the data source as below:
